Top 15 WordPress Plugins for 2017

Best WordPress Plugins for 2017 – Must have website

As mentioned above, the list includes some of the best WordPress SEO plugins, security plugins, speed optimization plugins, marketing and social media plugins. These plugins will help you to make your site robust, secure, SEO friendly and complete with all the aesthetics needed in a modern website.

Let’s explore them:

1. Jetpack (FREE)

jetpack-eseential-wordpress-plugins

A powerful plugin from the brilliant team behind the WordPress software itself (Automattic), Jetpack is a must have plugin for every WordPress website. As the name suggests, it offers a pack of awesome features for your website to fly up high and make it a success.

Jetpack takes care of your site security, website performance, traffic growth, image optimization, website appearance and a lot more.

jetpack-plugin-dashboard

It features enhanced distribution which automatically shares your published content to third party services like search engines and helps to increase your reach and traffic. Additionally, it creates sitemaps so that search engines can easily index your site.

Most of all, it protects your website security by preventing brute force attacks. It also monitors your site every five minutes for downtime and instantly notifies you for any issues found.

Download FREE

2. Akismet (Freemium)

akismet-essential-wordpress-plugins

Akismet is yet another plugin developed by the people behind WordPress (Matt and his team at Automattic). It is one of the default plugins of WordPress that comes with every new WordPress core installation. It is basically an anti-spam plugin which checks all comments and filters out the spammy comments.

The plugin provides a status history for each comment so that you can learn which comments were found spammy by Akismet or the moderator. Moderators also can view the number of approved comments for each user, see the URLs in the comment body and remove the suspicious links.

The plugin is free for the personal site and blogs while you have to subscribe its monthly plans for commercial sites. The premium plans provide advanced security solution besides spam protection.

It is a useful plugin to protect your WP security.

Download FREE    View Premium

3. Yoast SEO (Freemium)

yoast-seo-essential-wordpress-plugins

No doubt, search engines are the major source of traffic for every website. The number of internet users using search engines is reported to increase steadily, making the importance of SEO more relevant than ever. Fortunately, there is a great plugin like Yoast SEO for WordPress users.

Yoast SEO is an awesome plugin which guides you all the way to create better content and improve your ranking on search results. It focuses on creating the content which is useful to the users as well as technically SEO friendly. The goal is to help the users, gain trust and sustain the rankings which they call sustainable SEO.

yoast-seo-snippet-and-page-analysis

Firstly, it makes you choose a focus keyword and use the keyword appropriately in the article you are writing. Page analysis feature checks if you have used the focus keyword everywhere on the image alt tags, meta description, headings and the whole post. Furthermore, it suggests you to properly set up the text and images for better usability and visibility for search engines.

In addition, it helps you improve the way your page/ post looks on the search results with snippet preview. Creating better headlines and catchy Meta description can greatly increase the click through rates for your site.  It has added Readability feature which helps you to create a simple and understandable content.

Finally, here is another plugin called All in One SEO Pack which works quite similarly. You can try this too.

Download FREE    View Premium

4. Google XML Sitemaps (FREE)

google-xml-sitemaps-wordpress-plugin

Google XML Sitemaps is another very useful SEO plugin for WordPress. The plugin helps the search engines like like Google, Bing, Yahoo etc. to better index your site with a special XML sitemap.

As you activate the plugin, it will automatically create an XML sitemap for your site making it easy to index. A sitemap enables the search engine bots view the complete structure of your website and retrieve the results more efficiently.

google-xml-sitemaps-settings

The plugin notifies all the major search engines every time you publish something on your site.

Download FREE

5. All In One Schema.org Rich Snippets (FREE)

all-in-one-schema-org-rich-snippets-wordpress-plugin

You might have seen extra pieces of information like star ratings, images, number of reviews etc. below some of the pages on the search results.  They provide further information about the post/ page which users may want to know. Such brief extracts/ pieces of information like ratings are called Rich Snippets.

Rich snippets are the best way to beautify the appearance of your page/ post on search engine result pages. The snippets provide the main information about the product/ page briefly i.e. highlight the attractions of the product. This is why they help you get more click through rates through search engines.

To create rich snippets in WordPress website, you can use the handy plugin All In One Schema.org Rich Snippets. It provides the search engines with the precise information to be displayed in the search engine result pages. This helps your site rank better as well as get more click through rates.

Download FREE

6. W3 Total Cache (Freemium)

w3-total-cache-wordpress-plugin-essential-wordpress-plugins

WordPress caching is one of the best ways to improve website performance. The general idea of caching is storing the website data temporarily in the cache so that it loads faster the next time the user opens the same page. Cache is a place to store something temporarily in the computing environment.

To enable caching in WordPress, you can use WordPress caching plugins. Caching plugins will cache your posts and pages as static HTML files which are served to the users. This reduces page loading time drastically and helps to optimize overall site performance. Additionally, enhanced site-speed will profoundly impact your site SEO.

w3-total-cache-wordpress-plugin-dashboard

W3 Total Cache WordPress plugin is one of the most popular plugins and probably the best caching plugin for WordPress. It features page cache, database caching, object caching, browser caching and a lot more. Besides, it lets you integrate CDN services to reduce page load time. Besides, it has options to minify and HTTP compression of the HTML, JS, and CSS files so that you can save bandwidth up to 80%.

With the reduced loading time, you will get better ranking on search results which consecutively result into high traffic and more conversions.

Alternatively, you can use WP Super Cache which works quite similarly to the above plugin.

Download FREE      View Premium

7. WP Smush (Freemium)

wp-smush-wordpress-plugin

Images are the great assets for your post/ page which easily grab the users’ attention. Uploading images helps you deliver the message many times better that simply the texts can. They make your page look attractive, catchy and engaging.

While being so helpful to make you site more appealing to users, images also take up a lot of storage space and slow down your website. You can’t simply afford to ignore the slow site speed and look for the disaster to happen. Wait a while, here’s good news – you can compress images!

Yes, you can compress and optimize the images without reducing the quality of the images using WP Smush plugin. It optimizes all of your image files in JPEG, GIF and PNG formats using advanced compression techniques and saves lots of storage space. It auto-smushes all your attachments on upload while you can also smush your attachments manually in the media library.

wp-smush-plugin-bulk-smush

In addition, the plugin lets you smush bulk data (up to 50 attachments) at a time. The plugin is very useful as it helps your post/page look attractive while being fast.

Download FREE     View Premium

8. WP-Optimize (FREE)

wp-optimize-wordpress-plugin

WP-Optimize is a great tool for cleaning up WordPress database and optimizing WordPress. It automatically removes the unnecessary data from the WordPress without manual queries. The plugin always keeps your database optimized for the best performance.

There may be a lot of useless data in your website which weighs down your site while you may not be even aware of it.  With the plugin installed, you have lots of work done automatically. It removes all the spammy and un-approved comments, trash posts, and comments, trackbacks, and pingbacks etc. It will keep your database always clean and optimized.

Download FREE

9. BJ Lazy Load (FREE)

bj-lazy-load-wordpress-plugin

If you have a lot of images used in your site, it may take hours to load. That is annoying to users which often results in higher bounce rates. However, there is a solution to every problem and mostly in WordPress. Lazy loading is the mantra to make your site load faster with lots of images in the page.

To add lazy loading functionality in WordPress site, you can use a plugin like BJ Lazy Load. The plugin replaces all your post images, post thumbnails, gravatar images and content iframes with a placeholder and loads the content as it gets close to entering the browser screen. It displays the content (images) only when a user scrolls the page. Therefore, your site loads faster as well as saves bandwidth.

In addition, it works with text widgets, embedded videos from YouTube, Vimeo etc. It is a great plugin for website performance optimization and SEO.

Download FREE

10. Wordfence Security (Freemium)

wordfence-security-essential-wordpress-plugins

As a website owner, one of the most crucial things to do is to keep your site secure from the hackers. It is something that you cannot afford to ignore. There may be thousands of malicious bots on the web which can attack your website anytime and destroy your entire work in no time. That is why you must always prevent the spams and keep your website secure.

To keep your WordPress site secure, there are many security plugins available in WordPress. Among them, Wordfence Security is the one you can rely on. The plugin features Firewall protection, malware scan, blocking, login security, live traffic monitoring and a lot more. The plugin lets you monitor all your traffic in real-time including robots, humans, 404 errors, logins, logouts etc. as shown in the screenshot below:

With the monitoring your real-time traffic, you can be aware of the security threats your site is facing and take an instant action against it.

wordfence-security-real-time-site-activity

Moreover, the plugin has firewall application which prevents your site from being hacked. Blocking feature blocks all the known attackers, malicious networks which can be harmful to your site.  To enhance login security, it adopts Two Factor Authentication while it also checks the strength of all the user and admin passwords. This technique can greatly help you to fight brute-force attacks.

In conclusion, Wordfence Security is a great security plugin for WordPress.

Download FREE     View Premium

11. Broken Link Checker (FREE)

broken-link-checker-wordpress-plugin

You might have a great website with a remarkable number of daily visitors and doing a good business too. But have you ever thought about how users will react if they landed on a broken page? You can make a guess – that’s how you lose the possible customer as well as create a worse impression about your site. That’s devastating – you hate broken links.

And, here is good news – a handy plugin will monitor your website for all the broken links. Just install the free plugin Broken Link Checker and take a nice nap because it will do the job automatically. The plugin checks all your posts, comments and other content for broken links and instantly notifies you if any are found. In addition, it reports on the missing images as well so that you fix them quickly.

Furthermore, the plugin has options to prevent search engines from following the broken links, display the broken links differently etc. You can get notifications either via email or WP dashboard.

Download FREE

12. Redirection (FREE)

redirection-wordpress-plugin

There are times when you have to change the permalinks of your posts/ pages but you forget to redirect them. That is when users will land on a not available page following the old URL which doesn’t exist anymore. And, it is another way you are making your visitors upset.

In such cases, Redirection is the right plugin to pick. It helps you to manage all the 301 redirections and keep track of 404 errors. The plugin automatically adds a 301 redirection when a post’s URL changes whereas you can also add 301, 302, and 307 redirections manually for a post. You can redirect all the URLs and also have full logs for all redirected URLs.

Redirection is mainly useful when you are migrating pages from an old website, or changing the directory of WP installation.

Download FREE

13. MailChimp for WordPress (Freemium)

mailchimp-for-wordpress-wordpress-plugin

MailChimp is one of the most popular email marketing services to manage subscribers, send emails and track results in the bulk. It is no doubt a great marketing tool for the webmasters and business owners. To integrate MailChimp for a WordPress site is really easy with the plugin MailChimp for WordPress. It is a free plugin which allows you to add beautiful subscription forms in your WP blog. If you want to use the plugin for commercial purpose, you can try the premium version.

The plugin lets you create beautiful opt-in forms to add more subscribers to your email list. Besides, you can easily integrate the plugin with any other form on your site like contact form, comment or checkout form. It supports all the major form plugins like Contact Form 7, WooCommerce etc.

Install the plugin and start your email marketing campaign instant!

Download FREE        View Premium

14. Social Icons (FREE)

social-icons-essential-wordpress-plugins

Undoubtedly, social media is the most populated platform in the recent years. The number of social media users is ever increasing – more people obtain news and other information through social media. So, social media marketing is a vital part of content marketing these days. To boost your social media marketing, you can use a social media plugin like Social Icons.

Social Icons is a free WordPress plugin which provides you an easy way to display popular social icons on your website.  You can add social media icons to the pages or posts via widgets or shortcodes. The plugin supports over 100 popular social media platforms. It is simple and easy to use. You can instantly install the plugin and add social media icons in beautiful layouts.

The plugin offers further customization options for the icons – resizing the icons, square or rounded or grayscale background icon layouts etc.  It supports drag and drop icon sorting which makes your task much easier.

If you want more options, check out more social media plugins here.

Download FREE

15. Disable Comments (FREE)

disable-comments-wordpress-plugin

As the name suggests, Disable Comments is useful to globally disable comments on your entire site or certain post types. Considering that all the pages/ posts are not likely to accept user comments, the plugin provides an easy solution for disabling comments on post types, pages, and attachments. Besides, comments sometimes contain spam and unnecessary stuff.

In addition, the plugin provides an option to remove all the comment-related items from the Dashboard, widgets, Admin menu, and Admin Bar. It provides full-fledged features that you need to avoid comment spamming.

Download FREE 

Top Web Design Company List in Bangladesh

WEB.COM.BD – WEB DESIGN COMPANY


web.com.bd banner


WebComBD is the one of the leading & Professional web design & Development companies located in Dhaka, Bangladesh. WebComBD established in 2006 and 25 people strong. We have individual teams for every sections like projects analysis team, development team, design team, marketing team, customer support ect. and you will be glad to know that all of our teams are very active and dedicated. We have pools of talent that is looking for opportunities to exceed expectations through win / win solutions .

We built beautiful, functional, profit bringing website and it’s our key strengths. We also provide SEO, online marketing and mobile application development services. The LAMP stack is our favorite playground. Last 7 years we have built over 1000 sophisticated websites and portals for global clients in US, UK, Germany, Middle East, France, Oman, Australia, Canada, Hong Kong and more.

We have Started our journey in March 2006 with three people and few clients today we have over 25-30 full time employees and our number is expanding by the day. We have completed over 150 projects for customers across the globe. It is our beginning that has contributed to our growth and success today.

Visit – http://web.com.bd


ZAMAN IT


Untitled


ZAMAN IT is among the pioneers in the BANGLADESH, USA, CANADA, UK, UAE to offer quality web services to medium and small sized businesses to compete in today’s digital world. We possess the experience and expertise to help web entrepreneurs reach their customers across the digital space.

visit – http://www.zaman-it.com/


MY SOFT IT


Untitled


MY SOFT IT has been Web development, software development, graphics design, Domain Hosting and Online Marketing service provided since in 2012.

We have a very talented team for understand our client’s requirements quickly and consult them. We trust always in our quality and deadlines. we never loss our and our clients time as well as money. We value our clients ideas and creativity which help us improve our knowledge and experience also. We have separate expert for particular service and always give the best support and service to our clients.


visit – http://www.my-softit.com/


OVO Technology


Untitled


OVO Technology is a large IT base Company in Bangladesh. Our Mission is to give people a smart life. For this circumstances our slogan is ‘’Technology for smart life.” We are providing mainly IT based services such as Website Design and Development, Custom Online Software, Online Advertisements, Branded SMS Solutions, Domain Registration and Corporate Hosting and many more services.

We have a professional expert developer team who are working and experienced in corporate level for several years. All of our programmers are creative and diplomatic. Beside developer team we also have a young, talent and self motivated marketing team. They are expert in both corporate and online marketplace.

visit – https://ovotechnology.com


Ahsanul kabir


Untitled


Hello, This is KABIR. I am a web developer belongs to Mymensingh, Bangladesh. I started my career as a junior web designer 5 years ago. After getting experience from several IT / Web Development firms, now I am working in Mymensingh with A1 Net Solutions.

visit – http://www.ahsanulkabir.com/

How to Outsource Graphic Design or Web Design Works?

blog_5-myths-graphic

So you need a logo, or a banner, or maybe even something as simple as letterhead or a business card? You need it cheap, and you need it done well.

One of the single most frustrating things about running a small business or early-stage startup is knowing how important it is to have effective visuals yet also how little there is to spend on it.

Maybe you’ve tried coming up with something yourself. Maybe you’ve called in a favor from a friend who has an old version of Photoshop or hired a student you found on Craigslist. There are plenty of places you can turn to when your budget is limited and your need is great, and we’ve seen them all. Most of them turn out to be dead ends that waste time and money.

If you want great design, at great prices, you can now outsource most design jobs, meaning that the graphic design process is now faster, more affordable, and more reliable than ever…

We’ve tried using a number of graphic design outsourcing or online design services and can tell you what works and what doesn’t. Getting a great design result at a low cost is not always easy. There are definite challenges in using these low cost services. However if you approach it in the right way you can get great results.

All prices are quoted at the time of writing, and we do not profit from any of the following recommendations.

Design contests

With a design contest you post a project and choose an amount for an award. You can get several designers to work on your project and create designs (without receiving any payment). You choose a winner and they receive the award. You can often get up to 100 design alternatives for your project, and and in many cases you don’t need to pay unless you get the design that you are looking for.

A design contest seems like the perfect answer for getting design work done. However there are definite downsides. Most of the designers are either students or from India and other low wage countries. And mostly they are doing these competitions because they can’t get other work. So you can easily end up with 100 designs from perhaps 20 different designers, all of them absolutely terrible. It’s happened to us before. You really need to offer a large prize to attract the best designers. Our experience is that design contest are very good for getting logos designed – if you don’t get a logo you’re 100% happy with, you’ll at least have a range of concepts put in front of you. More involved work (web, UI, etc) can quickly go pear shaped in our experience.

The most popular design contest websites are:

  • Crowdspring
    Crowdspring works more like a contest than a traditional worker placement service. When you post a project, you don’t set an hourly or fixed rate—instead you choose an award amount. Graphic design projects start at a $200 award. According to Crowdspring, their postings get an average of 110 responses. In addition to the award, you’ll also pay a listing fee and a 15 percent project fee.You can give feedback and see revised work as designs come in. After choosing your favorite, you continue to refine the design with the designer until you’re happy with it. If you aren’t completely satisfied with the outcome or don’t get at least 100 responses, Crowdspring’s money-back guarantee refunds everything but the listing fee.
  • QuantumCLoud
    With more than 14 years of experience and proven track record as a reliable web design company to outsource, choosing QuantumCloud can be the most profitable partnership decision you ever make. QC is the White Label Outsourcing Specialists for Web Design Companies. Web Design, Web Development, WordPress Programming, WordPress Theme Customization, SEO or Mobile App Development – they are covered.
  • DesignCrowd
    To use DesignCrowd, you post a project, set a deadline, and deposit your project budget. The project is visible to more than 33,000 freelance graphic designers or studios worldwide, and according to DesignCrowd, the average listing gets 50 responses. The minimum project budget is $150, all but $40 of which is protected with a money-back guarantee in case you don’t find a project you’re happy with.
  • 99designs
    To post a graphic design project on 99designs, you create a brief description of what you want. Designers submit concepts to compete for your prize. You provide feedback and choose a winning submission. The winning designer gets the contest’s award, and you get the copyright to the original artwork.Prize minimums vary based on the type of work needed, from a minimum of $95 for a Twitter background design to a maximum of $495 for web page design or WordPress theme. As potential contractors respond with proposals, you give them feedback and request changes as needed. Once you’ve selected the one you like best, you can approve the files, download them and send payment.

It’s hard to say which is best amongst these three. Based on our experience, Design Crowd has more Australian based designers, however you have to offer the top level prizes to attract designers from developed countries. 99 designs is the most popular site, and so this has certain advantages (a larger base of designers on the site). We have also tried others such as Hatchwise, but don’t recommend you do the same – the user interface and design of this web site is horrible!

Warning to Freelancers – Good News for Business Owners
99 designs and DesignCrowd have been criticized for encouraging horribly cheap payment and heavy reliance on spec, or speculative, work – when artists or designers put substantial time into a project without any guarantee of payment. 99 designs also transfers copyright for the original artwork to the business.

While some graphic designers may find these sites too much trouble for the profit, others are more than willing to submit proposals on contests. So these sites remain a good bet for business owners who want to get projects done quickly, select from a variety of submissions, and work on a budget.

Project based and hourly work

If you already have a relationship with a great designer there are a lot of advantages in just working with one provider rather than launching a design contest each time you need a new design. Firstly the cost of design contents will add up if you use them for everything. And most importantly, a relationship with a great designer will enable them to know what types of design you want, and deliver designs faster than with a totally new designer. So it’s a great idea to launch a design contest, then pick a winner and perhaps hire the winner on an hourly basis for any further work.

Which is better paying hourly or paying per project? Either method is okay. Generally if you have only a few designs that you need completed, paying on a project basis makes the most sense. On the other hand if you need ongoing work over many months and dozens of different designs, paying hourly is a better arrangement as it becomes difficult to calculate accurately how much each project should cost. Of course you need a good way to monitor and track the hours worked for the designers (Time Doctor, or Upwork [formerly oDesk] are a couple of options).

Other ways that you can find designers for hourly or contract work

Freelancing sites like Upwork (formerly oDesk) allow you to post your job description and have people from all over the world bid on your jobs. Our experience with these sites quite honestly is that it is extremely difficult to find high quality designers. Most of the designers are from lower wage countries such as India, and to put it frankly their design skills are either very average, or terrible (or simply have a completely different aesthetic). However, there are exceptions. If you spend enough time trying to find a suitable person you can find great people on these sites. It takes a lot of work and time in trialing different people. It is much easier in our experience to find high quality programmers on these sites than to find designers.

Outsourcely

Outsourcely is the world’s easiest way to find, hire and work with reliable, vetted remote workers from 132 countries that are looking to build long-term sustainable relationships (not short-term freelance projects). Search remote workers by skill or post a remote job. Then connect with candidates immediately using real-time private chat, browser to browser video & voice calling, video & voice messaging or just regular email. This makes hiring fast and easy.

There are a few major differences between Outsourcely and the other talent marketplaces. The first is the talent pool on Outsourcely is mostly looking for long-term remote work, not short-term freelance projects. This is great for employers who are looking to build sustainable working relationships and long-term remote teams. The second is Outsourcely allows employers to hire workers directly and pay their hires directly. This can save employers thousands in fees the other platforms charge.

The third is how effortless it is to interview and hire talent with their real-time communication tools built right in. For example, you can connect with candidates immediately using private chat, browser to browser video & voice calling, video & voice messaging or just regular email. This makes hiring fast and easy. Prices start at $9 – $99 / month depending on how many individuals you’d like to interview and how many jobs you’d like to post.

Best of all, Outsourcely is giving all TimeDoctor customers a 30% discount. Just enter “staff30” to get 30% off all plans.

Elance

Elance lets employers post a job description publicly and review proposals from their qualified contractors, or post one privately and submit it only to workers selected from their directory. While you won’t be getting mock-ups or spec images from the people applying to your project, you do benefit from Elance’s broad userbase and can potentially snag a much more qualified professional who is looking for a quick and easy job.

The site comes with an impressive array of project management features, since it’s set up to handle not only graphic design work but also programming, writing, web design and a lot more. Elance allows you to collaborate with contractors, view works in progress, and manage workers’ time, if you choose to go hourly. Managers with fixed-price projects can set an unlimited number of milestones, each of which requires a status report from the worker.

Each project gets an Elance-hosted “workroom” with a file management system that allows collaborators to share files and leave comments. Entering time sheets, sending invoices and making payments can all be automated.

Employers may list projects for free, and contractors include the Elance fee in their quoted rate. When it comes time to pay for the work rendered, you can make payments using a credit card, Paypal, or ACH transfer from a bank account—you may also choose to make escrow payments through Elance, which pre-funds the work and makes payments when approved.

Upwork

Posting jobs and interviewing contractors is free on Upwork. The site takes a 10 percent commission from workers’ advertised rates. When you post a description of the work you need done publicly, interested designers will send you their cover letters and resumes. You also have access to their Upwork portfolios, relevant test results and feedback ratings. If you choose to post privately, you can search the database for contractors you’d like to work with and invite them to view your listing.

Like Elance, you can hire at an hourly or fixed rate. The site offers a Work Diary section that lets you view a memo about what a contractor is working on, screen shots six times an hour, and a graph showing their activity level. Hours worked are transferred to a financial report by Upwork automatically.

In addition to graphic design work, Upwork matches businesses and workers for web and software development, writing, customer service, marketing and other projects. You can pay contractors with a credit card – if you plan to spend at least $500 per week, you can apply to pay with checks.

Here is a tutorial I posted that will help you with hiring on Upwork: How to Find a Great Designer on Upwork (formerly oDesk)

Types of design work to outsource

Logos – In our experience design competitions are a great way of getting logos done.

Simple web site design or layouts- Design competitions are also great for this. If you really don’t have a lot of design requirements you can also go wtih a more simple method such as a pre-made design template (search on Google for design templates).

Complex web sites – Larger websites (more than 20 pages) that need a lot of different elements will likely need a lot of ongoing design work. It’s best to try and find a designer that you can pay on an hourly basis or for the project. On the other hand you can pay them to complete the entire project, however, make sure that you have very clear specifications.

User interface design – One of the most important aspects of designing your site is the usability. When users visit the site, can they navigate the site easily, can they find what they want? Do the forms work effectively, or do users find it difficult to fill them in? If you have a complex site with lots of things that the users need to do on the site, usability is crucial. Unfortunately, it’s difficult to find any designer that understands usability, and very difficult to find a low cost designer that understands usability. The best way to get started (if you have a low budget) is to learn about this by yourself and spoon feed the designer. Also you can copy conventions from sites that have multi-million dollar budgets that they spend on usability (Facebook, Linked In, Google etc).

Designing for conversion – Do you want your web site to actually SELL for you? This is an advanced skill that is almost impossible to find in low cost designers (and even in high priced designers!). Again you need to learn about conversion yourself (and direct the designer). Two great web sites with lots of free information on conversion are: marketingsherpa.com and abtests.com

Getting the design brief right

One of the most important factors to getting a good result is writing clear design specifications. 99 designs have some great templates for the sort of information you should cover in your design brief. For example, will your new logo be a word mark, pictorial mark, letter form or might it be based around a character? Will it be feminine, young, playful or loud, simple and modern? A good designer will need to know all of this information before they get started to help them create a relevant design for the target audience. Some examples of existing design you like will also help.

Tip: You should also make sure you designs are delivered in as many formats as possible. For instance, a vector version of your logo (scalable graphics) will be much more useful then a Photoshop document, although both versions might be useful.

Other useful information you should include in your brief
Along with a general description you should also try and clarify or provide the following information for your designer:
1. The title of project
2. How do you want the project delivered? FTP? Dropbox?
3. Due date and any other milestones
4. Any sketches or existing resources you might have, including any relevant market research
5. Any calls to action, headlines, or body copy that needs to be included in the design

In Conclusion

Design competitions are a great way to get started, and are fantastic for logo designs for example. If you need more complex ongoing work however you will need to develop a relationship with a designer and pay them per hour or project to create designs for you. You don’t need to spend $10,000 to get a great design for your business, you can get a good result with a much lower budget. If you are looking to hire someone on a more permanent basis, you can also try posting an advertisement on your local job sites, or in design forums like DesignersTalk.

Article source – https://biz30.timedoctor.com/how-to-outsource-graphic-design-jobs/


The Advantages of Outsource web design projects

outsource web design projects

Outsource web design projects to an offshoring gives offshoring gives you access to professional, expert and high-quality services. You can increase efficiency, productivity, time save, effort, manpower, operating cost etc.

Every side has an opposite side. So outsourcing web design projects has some advantages and disadvantages but advantages are most. Here I have included some advantages of outsourcing web design work

The Advantages of Outsource web design projects

• By outsourcing you can concentrate your core business more.
• Offshore company can give you a more professional and latest technology based works.
• Get more efficiency and productivity
• You can streamline your business operations.
• Outsourcing web design work you can save your time.
• Outsourcing can make your organization more flexible to change.
• Don’t need to pay attention extra to build info structure and latest technology
• Offshoring can help to reduce your total investment

You can solve team management problem by outsource web design projects

Business risk can be reduce by outsourcing web design work

There are several advantages of outsource web design projects to an offshore company.

How to Make a Drop Down Menu Using HTML and CSS3?

Image


Copy the html and css code. Now paste it to your html and css file.  Save it.

HTML:

<!DOCTYPE html PUBLIC “-//W3C//DTD XHTML 1.0 Transitional//EN” “http://www.w3.org/TR/xhtml1/DTD/xhtml1-transitional.dtd”&gt;
<html xmlns=”http://www.w3.org/1999/xhtml”&gt;
<head>
  <meta name=”viewport” content=”width=device-width”>
<link href=”style.css” rel=”stylesheet” type=”text/css” />
</head>

<body>
<div>
<span></span>
<nav>
  <ul>
    <li>
      <a href=””>Web Design Company</a>
      <ul>
        <li><a href=””>Bulldog</a></li>
        <li><a href=””>Mastiff</a></li>
        <li><a href=””>Labrador</a></li>
        <li><a href=””>Mutt</a></li>
      </ul>
    </li>
    <li>
      <a href=””>Cat</a>
      <ul>
        <li><a href=””>Tabby</a></li>
        <li><a href=””>Black Cat</a></li>
        <li><a href=””>Wrinkly Cat</a></li>
      </ul>
    </li>
    <li>
      <a href=””>Bird</a>
      <ul>
        <li><a href=””>Humming Bird</a></li>
        <li><a href=””>Hawk</a></li>
        <li><a href=””>Crow</a></li>
      </ul> 
    </li>
    <li>
      <a href=””>Horse</a>
      <ul>
        <li><a href=””>Brown Horse</a></li>
        <li><a href=””>Race Horse</a></li>
        <li><a href=””>Tall Horse</a></li>
      </ul> 
    </li>
    <li>
      <a href=””>Burger</a>
      <ul>
        <li><a href=””>Cheesy</a></li>
        <li><a href=””>More Ketchup</a></li>
        <li><a href=””>Some Mustard</a></li>
        <li><a href=””>Extra Butter</a></li>
      </ul> 
    </li>
  </ul>
</nav>
</div>
</body>
</html>

CSS3:

body {
  background: #ccc;
  font-family: helvetica, arial, serif;
  font-size: 13px;
  text-transform: uppercase;
  text-align: center;
}

.wrap {
  display: inline-block;
  -webkit-box-shadow: 0 0 70px #fff;
  -moz-box-shadow: 0 0 70px #fff;
  box-shadow: 0 0 70px #fff;
  margin-top: 40px;
}

/* a little “umph” */
.decor {
  background: #FC0;
  background: -webkit-linear-gradient(left, #CDEBDB 50%, #6EAF8D 50%);
  background: -moz-linear-gradient(left, #CDEBDB 50%, #6EAF8D 50%);
  background: -o-linear-gradient(left, #CDEBDB 50%, #6EAF8D 50%);
  background: linear-gradient(left, white 50%, #6EAF8D 50%);
  background-size: 50px 25%;;
  padding: 2px;
  display: block;
}

a {
  text-decoration: none;
  color: #FC0;
  display: block;
}

ul {
  list-style: none;
  position: relative;
  text-align: left;
}

li {
  float: left;
}

/* clear’n floats */
ul:after {
  clear: both;
}

ul:before,
ul:after {
    content: ” “;
    display: table;
}

nav {
  position: relative;
  background: #2B2B2B;
  background-image: -webkit-linear-gradient(bottom, #2B2B2B 7%, #333333 100%);
  background-image: -moz-linear-gradient(bottom, #2B2B2B 7%, #333333 100%);
  background-image: -o-linear-gradient(bottom, #2B2B2B 7%, #333333 100%);
  background-image: linear-gradient(bottom, #2B2B2B 7%, #333333 100%);
  text-align: center;
  letter-spacing: 1px;
  text-shadow: 1px 1px 1px #0E0E0E;
  -webkit-box-shadow: 2px 2px 3px #888;
  -moz-box-shadow: 2px 2px 3px #888;
  box-shadow: 2px 2px 3px #888;
  border-bottom-right-radius: 8px;
  border-bottom-left-radius: 8px;
}

/* prime */
ul.primary li a {
  display: block;
  padding: 20px 30px;
  border-right: 1px solid #3D3D3D;
}

ul.primary li:last-child a {
  border-right: none;
}

ul.primary li a:hover {
 
  color: #000;
  -webkit-transition: all 1.3s ease-in;/* Safari 3.2+, Chrome */
    -moz-transition: all 1.3s ease-in;/* Firefox 4-15 */
    -o-transition: all 1.3s ease-in;/* Opera 10.5-12.00 */
    transition: all 1.3s ease-in;/* Firefox 16+, Opera 12.50+ */
}

/* subs */
ul.sub {
  position: absolute;
  z-index: 200;
  box-shadow: 2px 2px 0 #BEBEBE;
  width: 35%;
  display:none;
}

ul.sub li {
  float: none;
  margin: 0;
}

ul.sub li a {
  border-bottom: 1px dotted #ccc;
  border-right: none;
  color: #000;
  padding: 15px 30px;
}

ul.sub li:last-child a {
  border-bottom: none;
}

ul.sub li a:hover {
  color: #000;
  background: #eeeeee;
}

/* sub display*/
ul.primary li:hover ul {
  display: block;
  background: #fff;
}

/* keeps the tab background white */
ul.primary li:hover a {
  background: #fff;
  color: #666;
  text-shadow: none;
}

ul.primary li:hover > a{
  color: #000;
}

@media only screen and (max-width: 600px) {
  .decor {
    padding: 3px;
  }
 
  .wrap {
    width: 100%;
    margin-top: 0px;
  }
 
   li {
    float: none;
  }
 
  ul.primary li:hover a {
    background: none;
    color: #8B8B8B;
    text-shadow: 1px 1px #000;
  }

  ul.primary li:hover ul {
    display: block;
    background: #272727;
    color: #fff;
  }
 
  ul.sub {
    display: block; 
    position: static;
    box-shadow: none;
    width: 100%;
  }
 
  ul.sub li a {
    background: #272727;
      border: none;
    color: #8B8B8B;
  }
 
  ul.sub li a:hover {
    color: #ccc;
    background: none;
  }
}

Simple PHP Contact Form Making

At first you have to create contact.php and send_contact.php file.
 
STEP1: Open file contact.php.  Keep the following code into there.
 
 Image
 

<table width=”500″ border=”0″ align=”center” cellpadding=”3″ cellspacing=”1″>
<tr>
<td><strong>Contact Form </strong></td>
</tr>
</table>
<table width=”500″ border=”0″ align=”center” cellpadding=”0″ cellspacing=”1″>
<tr>
<td><form name=”form1″ method=”post” action=”send_contact.php”>
<table width=”100%” border=”0″ cellspacing=”1″ cellpadding=”3″>
<tr>
<td width=”16%”>Subject</td>
<td width=”2%”>:</td>
<td width=”82%”><input name=”subject” type=”text” id=”subject” size=”50″></td>
</tr>
<tr>
<td>Detail</td>
<td>:</td>
<td><textarea name=”detail” cols=”50″ rows=”4″ id=”detail”></textarea></td>
</tr>
<tr>
<td>Name</td>
<td>:</td>
<td><input name=”name” type=”text” id=”name” size=”50″></td>
</tr>
<tr>
<td>Email</td>
<td>:</td>
<td><input name=”customer_mail” type=”text” id=”customer_mail” size=”50″></td>
</tr>
<tr>
<td>&nbsp;</td>
<td>&nbsp;</td>
<td><input type=”submit” name=”Submit” value=”Submit”> <input type=”reset” name=”Submit2″ value=”Reset”></td>
</tr>
</table>
</form>
</td>
</tr>
</table>


STEP2: Open file send_contact.php Keep the following code into there. Change this mail ‘outsource web design company@somewhere.com’ to your mail. 


 Image


<?php

// Contact subject
$subject =”$subject”;

// Details
$message=”$detail”;

// Mail of sender
$mail_from=”$customer_mail”;

// From
$header=”from: $name <$mail_from>”;

// Enter your email address
$to =’outsource web design company@somewhere.com’;
$send_contact=mail($to,$subject,$message,$header);

// Check, if message sent to your email
// display message “We’ve recived your information”
if($send_contact){
echo “We’ve recived your contact information”;
}
else {
echo “ERROR”;
}
?>

Simple Box Shadow Creating Code

Copy the html & css code and Paste it to your index and css file. Save it. When you move your cursor to web design company you will see a  Box Shadow hover effect. Now you can implement this code to your site.

ImageHTML:

<ul>
        <li><a href=”#”>Web Design Company<span></span></a></li>
</ul>

CSS:

.nav {
width:200px;
height:60px;
border:1px solid #CCC;
list-style:none;
background-color:#F09;
}

ul.nav li {
margin-top: 10px;
}

ul.nav li a{
    text-decoration:none;
    }

ul.nav li a:hover{
-ms-filter: “progid:DXImageTransform.Microsoft.Shadow(Strength=20, Direction=135, Color=#333333)”;/*IE 8*/
-moz-box-shadow: 5px 5px 20px #333333;/*FF 3.5+*/
-webkit-box-shadow: 5px 5px 20px #333333;/*Saf3-4, Chrome, iOS 4.0.2-4.2, Android 2.3+*/
box-shadow: 5px 5px 20px #333333;/* FF3.5+, Opera 9+, Saf1+, Chrome, IE10 */
filter: progid:DXImageTransform.Microsoft.Shadow(Strength=20, Direction=135, Color=#333333); /*IE 5.5-7*/
}

How to Create a Responsive Menu?

Responsive menu

HTML

Inside the head tags add the Meta viewport.

Meta viewport:

This Meta viewport tag is required for our page to scale accurately.

<meta name=”viewport” content=”width=device-width, initial-scale=1, maximum-scale=1″>

… Then add the following code as the navigation inside the body tag.

<nav class=”clearfix”>

<ul class=”clearfix”>

<li><a href=”#”>Web design company</a></li>

<li><a href=”#”>Web design Services</a></li>

<li><a href=”#”>Web development company</a></li>

<li><a href=”#”>CMS web development</a></li>

<li><a href=”#”>Mobile application development</a></li>

<li><a href=”#”>Web design blog</a></li>

</ul>

<a href=”#” id=”pull”>Menu</a>

</nav>

We have added six primary menus and added one more link after them. This extra menu will be used to pull the menu navigation when it is hidden in a small screen.

Styles

This section is for styling the navigation.

body {

background-color: #ece8e5;

}

The nav tag that define the navigation will have 100% full width of the browser window, while the ul where it contains our primary menu links will have 600px for the width.

nav {

height: 40px;

width: 100%;

background: #455868;

font-size: 11pt;

font-family: ‘PT Sans’, Arial, sans-serif;

font-weight: bold;

position: relative;

border-bottom: 2px solid #283744;

}

nav ul {

padding: 0;

margin: 0 auto;

width: 600px;

height: 40px;

}

Then, we will float the menu links to the left, so they will be displayed horizontally side by side.

nav li {

display: inline;

float: left;

}

See the html markup above; we’ve already added clearfix in the class attribute for both the nav and ul to clear things around when we float the elements inside it using this CSS clearfix hack. So, let’s add the following style rules in the style sheet.

.clearfix:before,

.clearfix:after {

content: ” “;

display: table;

}

.clearfix:after {

clear: both;

}

.clearfix {

*zoom: 1;

}

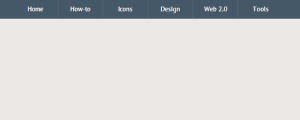
Since we have six menu links and we also have specified the container for 600px, each menu links will have 100px for the width.

nav a {

color: #fff;

display: inline-block;

width: 100px;

text-align: center;

text-decoration: none;

line-height: 40px;

text-shadow: 1px 1px 0px #283744;

}

The menu links will be separated with 1px right border, except for the last one. Remember our previous post on box model, the menu’s width will be expanded for 1px making it 101px as the border addition, so here we change the box-sizing model to border-box in order to keep the menu remains 100px.

nav li a {

border-right: 1px solid #576979;

box-sizing:border-box;

-moz-box-sizing:border-box;

-webkit-box-sizing:border-box;

}

nav li:last-child a {

border-right: 0;

}

nav a:hover, nav a:active {

background-color: #8c99a4;

}

After that the extra menu link will be hidden (for the desktop screen).

  1. nav a#pull {
  2.     display: none;
  3. }

At this point, we only styling the navigation and nothing will happen when we resize the browser window. So, let’s jump to the next step.

Responsive menu designed

Media Queries

responsive menu deveice screen size

The CSS3 media queries are used to define how the styles will shift in some certain breakpoints or specifically the device screen sizes.

Since our navigation is initially 600px fix-width, we will first define the styles when it is viewed in 600px or lower screen size, so practically speaking, this is our first breakpoint.

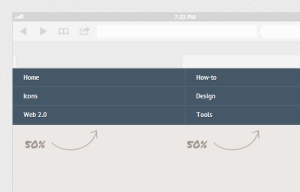
In this screen size, each of two menu links will be displayed side by side, so the ul‘s width here will be 100% of the browser window while the menu links will have 50% for the width.

responsive 600 screen size

@media screen and (max-width: 600px) {

nav {

height: auto;

}

nav ul {

width: 100%;

display: block;

height: auto;

}

nav li {

width: 50%;

float: left;

position: relative;

}

nav li a {

border-bottom: 1px solid #576979;

border-right: 1px solid #576979;

}

nav a {

text-align: left;

width: 100%;

text-indent: 25px;

}

}

…and then, we also define how the navigation is displayed when the screen get smaller by 480px or lower (so this is our second breakpoint).

In this screen size, the extra link that we’ve added before will start visible and we also give the link a “Menu” icon on its right-side using the: after pseudo-element, while the primary menu links will be hidden to save more vertical spaces on the screen.

responsive menu 480 screen size

@media only screen and (max-width : 480px) {

nav {

border-bottom: 0;

}

nav ul {

display: none;

height: auto;

}

nav a#pull {

display: block;

background-color: #283744;

width: 100%;

position: relative;

}

nav a#pull:after {

content:””;

background: url(‘nav-icon.png’) no-repeat;

width: 30px;

height: 30px;

display: inline-block;

position: absolute;

rightright: 15px;

top: 10px;

}

}

Lastly, when the screen gets smaller by 320px and lower the menu will be displayed vertically top to bottom.

@media only screen and (max-width : 320px) {

nav li {

display: block;

float: none;

width: 100%;

}

nav li a {

border-bottom: 1px solid #576979;

}

}

Now, you can try resizing the browser window. It should now be able to adapt the screen size.

Showing the Menu

At this point, the menu will still be hidden and will only be visible when it is needed by tapping or clicking on the “Menu” link and we can achieve the effect using the jQuery slideToggle().


$(function() {

var pull        = $(‘#pull’);

menu        = $(‘nav ul’);

menuHeight  = menu.height();

$(pull).on(‘click’, function(e) {

e.preventDefault();

menu.slideToggle();

});

});


However, when you resize the browser window right after you’ve just viewed and hid the menu in a small screen, the menu will remain hidden, as the display: none style generated by the jQuery is still attached in the element.

So, we need to remove this style upon the window resizing, as follows:


$(window).resize(function(){

var w = $(window).width();

if(w > 320 && menu.is(‘:hidden’)) {

menu.removeAttr(‘style’);

}

});

Alright, that’s all the codes we need to make a nice responsive navigation.